Vocabulary
Fixture – a housing and the electrical components contained in that housing, a luminaire.
Lamp – a light bulb.
Transformer – an electrical power source; this device is required to operate any low voltage fixture, in this case 12-volts.
Circuit – a closed, usually circular electrical line that leaves a transformer (positive) and returns to the transformer (common)
Design Voltage – the amount of voltage a fixture is designed to operate on; the actual voltage that you supply may be more or less depending on the wiring method.
Fixture and Lamp Selection
The fixtures and lamps are selected after determining which features of your landscaping are to be used. Decorative fixtures will be placed in plain sight; otherwise, conceal the light source when possible.
Bullet/Directional Lights – These designs help focus and direct the light beams. Some also cut off glare and protect the lamp and socket from debris and moisture.
Area/Path/Bollard Lights – These low level units are designed to cast illumination in a broader pattern for: flower beds, perimeter plantings, driveways, steps and paths.
In-ground/Well Lights – Burying these fixtures flush with the ground conceals the light source. Use for up-lighting trees and shrubs, an grazing textured walls.
Accent/Spot Lights – Versatile/adjustable fixtures used for up-lighting, cross lighting, accenting and grazing. When mounted high up provide focused down-lighting and moonlighting.
Deck/Step/Brick Lights – These wall mount fixtures light pathways, steps, garden walks, deck and pool areas.
Incandescent lamps are the standard type commonly used around the home. They are inexpensive but yield less light than other bulbs. Halogen and Quartz lamps are a compact light source which provides a consistently bright light. These are available as a reflector (MR) and as a projector (PAR) type for controlling the direction of the light. These fit into smaller and less obtrusive fixtures.
Mounting Method
The mounting method is determined by the location of the fixture. Metal canopies allow you to mount fixtures to a deck or soffit, while plastic stakes are for mounting into the ground. There is an extensive variety of selection in mounting hardware, so check to see which kind is offered with your light fixture.
Power Cable
It is important to note that the cable referred to in this document is two-pronged; i.e., there are two independent wires inside.
The cable lengths in your design will determine many further aspects of your lighting system. You want a cable wire that will deliver the best voltage to each individual fixture, and the best method for selecting this cable begins with a layout of your project. Be sure to include all landscape features, buildings, individual light fixtures, and power supplies in your drawing.
Group your light fixtures into clusters of 2 to 6; do not form a group whose total wattages exceed 240 Watts. One cluster at a time, select a fixture -or a point between two fixtures- that is the most centralized and draw a line from the power supply to this point (your center point). From the center point, draw a line to the nearest fixture on the right, and do the same for the nearest fixture to the left. Repeat this process from the two newly connected fixtures until the entire cluster is connected.
To achieve this wiring method, you will need a common device known as a T-connector. The T-connector allows you to place your cable along the path of the lights, cut the cable at the last light, and then connect the middle of the laid-out cable to a new piece of cable that will run back to the power supply. Then you will use a similar item known as a Quick Connector to fasten the laid-out cable to each light fixture. These Quick Connectors are included with most low-voltage outdoor landscape lights. If quick connection devices are not available, you can use a common wire nut. Place a small bead of household silicone seal inside the wire nut to create a water-tight fit. 
Now you must determine the amount of voltage being delivered to each fixture of each cluster. Though you may start with 12 Volts, there is a phenomenon called voltage drop that will reduce the voltage being delivered to each fixture. Voltage drop on your system will affect lamp life and the amount of light the lamps will deliver. Too much voltage drop lowers the light output and changes the color of the light. Too little voltage drop burns the lamps too hot and shortens the lamp life. A good rule of thumb to prevent voltage drop is no more than 100 Watts on 100 feet of 12/2 cable. Here is a handy tool for calculating the correct wire size for lighting design.
<<<<<<<<<<<<<<<<<<<<>>>>>>>>>>>>>>>>>>>>
Click here to go to the Power Cable Calculator
<<<<<<<<<<<<<<<<<<<<>>>>>>>>>>>>>>>>>>>>
Another very effective way to eliminate voltage drop is to use continuous loop wiring. This entails the same preparation as the T-connector method, except you lay the cable from the transformer, along side each light fixture (one cluster per cable), and back to the transformer. To achieve continuous loop, simply connect both ends of one wire of the cable to the Positive lead and both ends of the other wire of the cable to the Common lead. Be very careful to not mix these connections! The two internal wires can be distinguished by their markings. One will have a solid color and the other will have writing, a stripe, or a different solid color.
Sometimes, a lighting designer or a home owner will want to take advantage of voltage drop. Here is a table showing the effects voltage drop has on standard non-halogen lamps. With a halogen lamp, a voltage feed of less than 10.8 Volts may have a negative effect.
|
Voltage |
Light Output |
Lamp Life |
|
12.5 V |
170% |
80% |
|
12 V |
100% |
100% |
|
11.5 V |
80% |
200% |
|
11 V |
75% |
300% |
|
10.8 V |
70% |
400% |
|
10.5 V |
65% |
500% |
As you can see, a lamp with a design voltage of 12 Volts will deliver 80% of its light output and its life will double by reducing the voltage to 11.5 Volts. The light loss is hardly noticeable to the naked eye while lamp life is generously extended. Therefore, you want to experience a slight voltage drop to all lamps in your low voltage lighting system. The recommended feed to each lamp is between 10.8 Volts and 11.5 Volts.
Voltage drop is determined by multiplying the total watts on the cable by the total length of cable and dividing by the cable constant listed below. A smaller number gauge equals a larger sized wire.
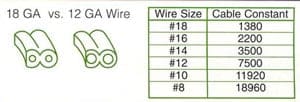
Cable length – length of cable used from the transformer to the fixture on which you are measuring the voltage drop (in feet).
Total watts – sum the wattages of every lamp along the cable length.
Cable constant – indicates the thickness of copper wire; a thicker wire results in less voltage drop.
|
Cable length X Total watts |
= Voltage Drop |
| Cable constant |
IMPORTANT! When most of your lights are at the far end of the run, multiply your answer by 1.5 (i.e., multiply the voltage drop by 150%).
Always start your calculations with 12-gauge wire. The voltage at a fixture is the actual voltage supplied (12 Volts) minus the voltage drop. The voltage supplied may be increased by use of a multi-tap transformer. These multi-taps have alternate voltage sources to counteract a long cable run with too high of a voltage drop. Another way to counteract a high voltage drop is change to a thicker wire, such as 10-gauge. If you need more voltage drop than you are getting, you may change to a thinner wire, such as 14-gauge, but a thinner wire supports less wattage. Here is a chart to determine the maximum wattage allowed for each buried wire.
| Gauge | #18 GA | #16 GA | #14 GA | #12 GA | #10 GA | #8 GA |
| Max Wattage | 120 W | 156 W | 180 W | 240 W | 300 W | 480 W |
Transformer Guidelines
A low-voltage transformer is an electrical device that changes voltage by inversely adjusting the current. A transformer contains a positive terminal and a common terminal. Your supply cable is connected to one of each terminal thus making a circuit as soon as the first quick connector is attached. The transformer is critical to your low-voltage landscape lighting.
The low voltage transformer is selected by first determining the total wattage being used in your plan. Select a transformer that has a higher wattage capacity than the total wattage being used; this will give you potential to expand or alter your design. You may need multiple transformers to achieve your landscape look. No single circuit may have more than 300 Watts of power, but one transformer can handle multiple runs of cable. The transformer will be placed close to the power source, and some are even rated for indoor installation. Your transformer must be at least one foot off the ground to avoid potentially rising water. All transformers must dissipate heat to cool; you should leave a 3-inch clearance around the transformer housing for indoor transformers.
If you have read this far and still have questions, now may be the time to call an experienced lighting consultant at LED Spot. We’re happy to help guide you thru your lighting project.
